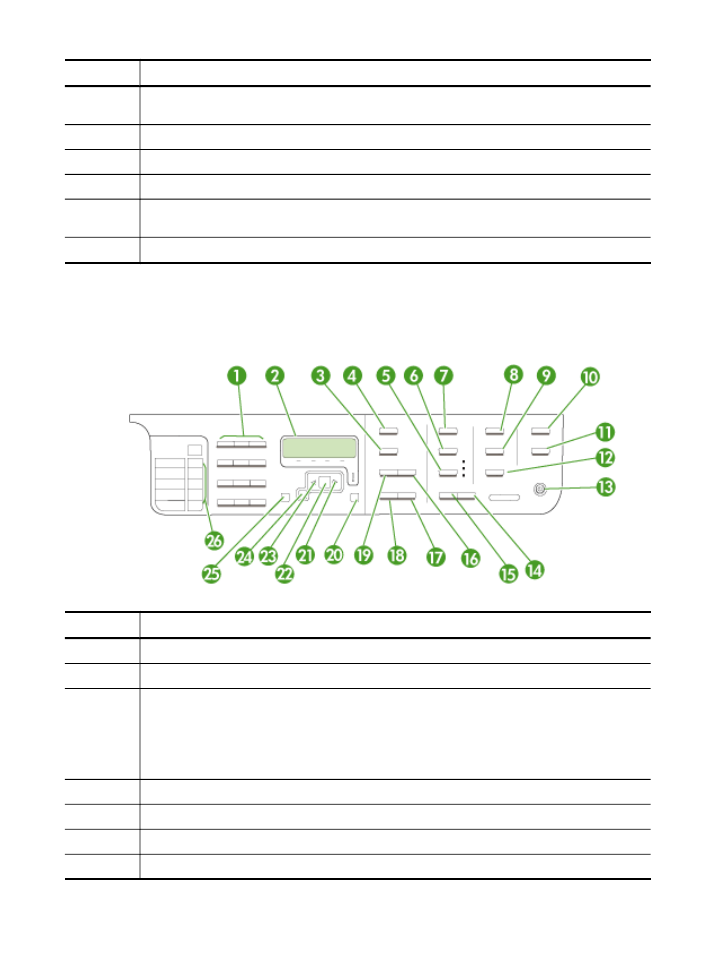
Control-panel buttons and lights (Two-line display)
The following diagram and related table provide a quick reference to the device control
panel features.
Label
Name and Description
1
Keypad: Enters fax numbers, values, or text.
2
Display: View menus and messages.
3
Presents menus and messages: The button name and functionality depends on the country/
region in which the device is sold.
Resolution: Adjusts the resolution for the fax you are sending.
Junk Fax Blocker: Presents the Junk Fax Blocker Set Up menu for managing unwanted fax
calls. You are required to subscribe to a caller ID service to use this feature.
4
FAX: Presents the Fax menu for selecting options.
5
Quality: Selects Best, Normal, or Fast quality for copying.
6
Reduce/Enlarge: Changes the size of a copy for printing.
7
COPY: Presents the Copy menu for selecting options.
(continued)
Understand the device parts
17

Label
Name and Description
8
SCAN: Presents the Scan menu for selecting a scan destination.
9
To Memory Device: Scans and saves a document to a folder and shares documents with
other people on your network.
10
PHOTO: Presents the Photo menu for selecting options.
11
Start Photo: Selects the photo function.
12
START SCAN: Starts a scan job and sends it to the destination you selected using the Scan
button.
13
Power: Turns the device on or off. The Power button is lit when the device is on. The light
blinks while performing a job.
When the device is turned off, a minimal amount of power is still supplied. To completely
disconnect the power supply, turn the device off, and then unplug the power cord.
14
START COPY Color: Starts a color copy job.
15
START COPY Black: Starts a black-and-white copy job.
16
Auto Answer: When this button is lit, the device automatically answers incoming phone
calls. When off, the device does not answer any incoming fax calls.
17
START FAX Color: Starts a color fax.
18
START FAX Black: Starts a black-and-white fax.
19
Redial/Pause: Redials the most recently dialed number, or inserts a 3-second pause in a fax
number.
20
Cancel: Stops a job, exits a menu, or exits settings.
21
Right arrow: Increases values on the display.
22
OK: Selects a menu or a setting on the display.
23
Left arrow: Decreases values on the display.
24
Back: Moves you one level up in the menu.
25
Setup: Presents the Setup Menu for generating reports and other maintenance settings, and
accessing the Help menu. The topic that you select from the Help menu opens a help
window on your computer screen.
26
One-touch speed-dial buttons: Accesses the first five speed-dial numbers.
Chapter 1
(continued)
18
Get started